On this occasion I will feature five ways to improve the performance of the Blackberry, from the performance of application access, Internet access to the performance of which may always be done at any time by users.
BlackBerry will further slow down performance if not push memory storage capacity. There are many things that can make the internal storage memory or even a BlackBerry thinned out unnoticed by the user.
Five ways to accelerate the performance of BlackBerry
1. Use Memory Cleaner
To clean up memory on your BlackBerry, can by going to Options -> Security Options -> Advanced Security Options -> Memory Cleaning -> change the status to Enabled Disabled -> Clean Now
2. Clear the browser cache to improve performance
Cache is not cleared in the browser will further slow down the performance of the browser itself. How to clean cache on BlackBerry is quite easy, first go to Browser -> Menu -> Options -> Clear browsing data -> Select all -> Clear now
3. Close the application process is not used.
To see what processes are running on the BlackBerry, is easy enough. Simply press' alt + ESC "simultaneously. Having seen the application list, choose applications which will be closed.
4. Routinely in clearing the Event Log
In the 'Home screen' press and hold down the 'ALT' and press the letter 'L', 'G', 'L', 'G' -> Press the 'Menu' -> Select 'Clear log'
5. Always make sure the state of internal memory is sufficient, balanced, and not too much is used. That is why the presence of external memory is very important in storing the data so as not to give a heavy load of internal memory.
That's five easy ways to accelerate the performance of the BlackBerry. May be useful.
Saturday, March 24, 2012
How to make Blackberry Battery power more durable
You want to make batteries BlackBerry (BB) you are more durable? We have 10 simple tips that you can use to ensure you get the most out of battery power you need.
BlackBerry smartphones are known as one of the gadget that has a pretty impressive battery life compared to other smartphones. But if you're a heavy user who usually frequent fuel BB's, chatting, browsing and social networking status update then certainly your battery will run out before you finish the day's activities.
There are many settings you can customize to make your battery a little more durable than normal so you can maximize your BB usage throughout the day.
Here are ten tips and tricks to save and maximize the use of your BlackBerry battery. These tips work to improve battery life on devices with OS 6 and OS lower as well, although the menu may be different.
1. Use WiFi when available, and turn off WiFi when not in use
WiFi seems to be the greatest influence in the stamina battery on the newer devices like the Bold 9900/9930. The test results showed that use WiFi for browsing have the battery life is more durable than relying on a network operator. This is caused by the radio does not have to work hard. However, if you do not need to use WiFi or if you are in a place where there are no WiFi connection, make sure you turn it off so it does not undermine the function of your battery. This is to avoid your BB device continues to search the network and battery drain.
I turn on or off WiFi:
Click on the Settings Network (Network Settings) at the top of the home screen (homescreen) you, check the box to turn on and turn off the check mark to disable this function.
2. Reduce the brightness of the lamp
Standard backlight brightness when you buy a new BB is 70%. Brightness was enough to see the screen clearly and make everything seem brighter. However, the natural tendency of BB user is to see things as brightly as possible even raise the brightness to 100%. It can more quickly deplete battery life and undermined. Lowering the brightness will help your battery stamina.
Try lowering your screen brightness to 10%. This may seem a bit dark at first for some people, but believe me, once you adjust the brightness, you'll know the difference in your battery life.
To change the backlight brightness you:
Go to Options> Display> Home screen or in English, Options> Display> Screen Display. Select Backlight Brightness and change it to 10 or in English, select the Backlight Brightness and change it to 10.
3. Change the Backlight Timeout (backlight timeout) you
Backlight Timeout is the length of time your screen where the backlight stays on even when you have finished using your BB. In most cases some people have a limit of time (1-2 minutes) after using their BB devices. Set the time to 10-20 seconds in order to better conserve your battery.
To adjust the Backlight Timeout: Go to Options> Display> Home screen or in English, Options> Display> Screen Display. Change the backlight timeout to 20 seconds or in English, select the Backlight Timeout and change it to 20 Sec.
4. Turn off Bluetooth when not in use
Bluetooth is a great feature of the BlackBerry smartphone. This technology lets you connect to devices such as headsets, computers, speakers and more. But when not in use, Bluetooth can slowly take your battery as a whole. If you are not using Bluetooth, do not forget to turn it off.
To turn off the Bluetooth function, similar to WiFi:
Click on the network settings on the screen the top of your homescreen. Bluetooth uncheck (to turn on Bluetooth, check the Bluetooth)
5. Change the network settings to 2G
Doing this can be a great aid in battery life. Set the radio network to the 2G make no attempt to find the best signal so that your BB will be more durable use of battery power.
Change your network settings to 2G: Click on the network settings on the screen of your home (as well as steps to WiFi and Bluetooth). Select Network and Connections> Mobile Network, or in English, the Network and Connection> Mobile Network. Select the 2G.
You can use 3G if you want to use for the phone or browsing faster, but if not used do not forget to set it to 2G.
6. Use the feature Auto On / Off or Bedside Mode
This is a simple feature that is not too well known to the BlackBerry Smartphone. Auto on / off is the ability to automatically turn on and off the device at any given time. This feature is useful if you know the schedule when you're not using your BB, such as the time when you sleep or exercise.
To use the Auto On / Off:
Select Options> Tools> Auto On / Off, or in English, Options> Device> Auto On / Off. Centangkan "switch" to Business Day, Weekend or both, or in English, check enabled. Choose a time of turning on and off the device (eg, 10:00 to 07:00)
7. Always lock your device or use a BlackBerry Holster Case
BB lock you can help conserve battery life because, when you save it in your pocket while walking, sometimes you will be depressed BB buttons that light up the screen without your mind. To prevent this you can use the lock button on your device. Use of any of the BlackBerry holster that contains a magnet also direkomendaskan. This glove is automatically given a command to the device to sleep when you put your BB into the holster.
8. Turn off unused Apps
Close unused applications to help battery life. Applications are constantly pulling your GPS location is really throwing your battery life. To close this application, you can use the built-in App Switcher to see what application is running on your device. You then can choose to turn off unused applications.
To close unused applications: Press and hold the Menu button to open the application switcher
Highlight and select the application you want to cover. When in the application, press the Menu button and then exit (shutdown, logout) app.
9. Change Settings App Refresh
Applications such as Twitter, Facebook and others are applications that continue to refresh the news at five times per minute. You can change the refresh time to a longer time, eg: Twitter can be set to refresh from five minutes to an hour. App has refreshed every five minutes is not the best idea if you want to save battery power, change to 1 hour or even turn it off. The same thing happened to Facebook, SocialFeed and other applications that always refreshes for a certain period.
10. Charge your device or buy a spare battery
Last but not least, prepare charger when you need to travel far. This is the easiest way to use BB all day. You can deduct your BB in the car, office, or in a cafe when you are conducting the meeting. However, when you're more likely to go during the day and hard to find a place to charge your BB will be, it would not hurt if you buy a spare battery.
Hopefully these tips useful for you BlackBerry users.
How To free up memory space on your BlackBerry Smartphone
Having a smartphone is critical to periodically check the memory. There is insufficient memory like when we hold a smartphone, hundreds of songs, videos, themes and games to download it always wants to maximize the enjoyment of your smartphone. But, taukah you? when our smartphone memory is too full, call logs and messages will be deleted first. Of course we do not want, the important message is lost on the last night the next day.

So to prevent this from happening, we will discuss the best and most common way to free up memory on your device. Some things are "technical", but we are confident of Gadgetan most users can do it.
First, you must have a memory card (MMC) for your device. MMC is one of the most important accessories is priceless. This gives you more room to store all that you want to download without consuming memory on your device.
Second, free memory in a way that does not remove the application you use on your device. To do this, from the BlackBerry home screen, press the Menu button, then go to Options> Advanced Options> Applications. Select the unused applications and press the Menu key, select Delete. After that, Reboot your device.

The next things we can do to free up memory by way of a fairly simple example:
Enable Content Compression: Go to Options> Security and enabled Content Compression, this will free up some space.
Removing Applications "Help": your BlackBerry you do not really need this application. Go to Options -> Applications, select Help and delete.

Remove Video Samples: Go to Options> Advanced Options> Applications. Highlight BlackBerryVideo samples, press Menu and Delete.
Clear language is not in use: you will have the option of their untukmenghapus Application Loader screen.
Delete Image: Delete unwanted images or move them to your memory card.
Clean Up Cookies and Cache Browser: Launch the mobile browser. Press the Menu key and select Options> Cache Operations. Clear History & Clear Cookies.
Giving the Device Memory Limit: Start Media Applications. Press the Menu key. Change the Device Memory Limit to 12MB.


Change Save Time for Messages: Click the Messages icon, press the Menu key and select Options> General Options> Scroll to Keep Messages and set up the shortest time.
Change Call Log Options: Click the phone icon. Press the Menu key. Select Options> Call Logging, change to no calls (none)
Limit your Themes: Everyone wants to have fun and good themes, but only limits have 1 or 2 themes on your device will save a lot of space.
In addition to the above simple way, there is a more technical nature. Attach the data cable and make sure you have the "BlackBerry Desktop" on your PC or laptop. Perform data backups, when the backup is complete, close the Desktop Manager and unplug your BB. Delete vendor.xml file from your PC are usually located in c: program FilesCommon filesresearch in motionapploader. This file is really not necessary because only notify specific operators, device and your OS.
There are certain items that can be removed to save space such as Voice Activated Dialing (VAD), Push to Talk (PTT) on some AT & T Devices, themes etc.. Decide what you do not use and we can remove it from the device. Once done, connect your device to the PC again and run the Application Loader to complete the change.
Well, hopefully these tips useful for you BlackBerry users.

So to prevent this from happening, we will discuss the best and most common way to free up memory on your device. Some things are "technical", but we are confident of Gadgetan most users can do it.
First, you must have a memory card (MMC) for your device. MMC is one of the most important accessories is priceless. This gives you more room to store all that you want to download without consuming memory on your device.
Second, free memory in a way that does not remove the application you use on your device. To do this, from the BlackBerry home screen, press the Menu button, then go to Options> Advanced Options> Applications. Select the unused applications and press the Menu key, select Delete. After that, Reboot your device.
The next things we can do to free up memory by way of a fairly simple example:
Enable Content Compression: Go to Options> Security and enabled Content Compression, this will free up some space.
Removing Applications "Help": your BlackBerry you do not really need this application. Go to Options -> Applications, select Help and delete.
Remove Video Samples: Go to Options> Advanced Options> Applications. Highlight BlackBerryVideo samples, press Menu and Delete.
Clear language is not in use: you will have the option of their untukmenghapus Application Loader screen.
Delete Image: Delete unwanted images or move them to your memory card.
Clean Up Cookies and Cache Browser: Launch the mobile browser. Press the Menu key and select Options> Cache Operations. Clear History & Clear Cookies.
Giving the Device Memory Limit: Start Media Applications. Press the Menu key. Change the Device Memory Limit to 12MB.
Change Save Time for Messages: Click the Messages icon, press the Menu key and select Options> General Options> Scroll to Keep Messages and set up the shortest time.
Change Call Log Options: Click the phone icon. Press the Menu key. Select Options> Call Logging, change to no calls (none)
Limit your Themes: Everyone wants to have fun and good themes, but only limits have 1 or 2 themes on your device will save a lot of space.
In addition to the above simple way, there is a more technical nature. Attach the data cable and make sure you have the "BlackBerry Desktop" on your PC or laptop. Perform data backups, when the backup is complete, close the Desktop Manager and unplug your BB. Delete vendor.xml file from your PC are usually located in c: program FilesCommon filesresearch in motionapploader. This file is really not necessary because only notify specific operators, device and your OS.
There are certain items that can be removed to save space such as Voice Activated Dialing (VAD), Push to Talk (PTT) on some AT & T Devices, themes etc.. Decide what you do not use and we can remove it from the device. Once done, connect your device to the PC again and run the Application Loader to complete the change.
Well, hopefully these tips useful for you BlackBerry users.
Saturday, March 10, 2012
How to share internet between 2 PC
It is my experience after trying various ways share internet between 2 PC, the way I think the most easy and quick to share internet between two PCs below. However, there are the conditions that:
1. A computer has two LAN card (let's call it LAN 1 and LAN 2)
2. A computer on the LAN 1 has been connected to the Internet via a modem and was able to be used for surfing the internet (ngenet)
3. Computer B only need one LAN only (hereafter we call LAN 3)
4. Computers A and B have been connected to the LAN cable types CROSS
As for how the connections are:
A computer on
1. Log start | Control Panel | Network Connections
2. Right-click the LAN 1 (which is connected to the internet modem) select the status tab support, note the IP Address, Subnet Mask and Default Gateway, for example:
IP Address: 192.168.1.2
Subnet mask: 255.255.255.0
Default Gateway: 192.168.1.1
*) Remember and take note! This is very important!
3. If it has been noted Close, now right click select properties 2 LAN
4. On the General tab select Internet Protocol (TCP / IP) and then select Properties
5. Set the IP addresses manually, enter the IP address use the Following the
IP Address: 192.168.1.3
Subnet mask: 255.255.255.0
Default Gateway: 192.168.1.1
To control the content of the
Prefered: 8.8.8.8
Alternate: 8.8.4.4
6. Once filled out correctly, click OK.
7. Go back to Go to start | Control Panel | Network Connections blocks 1 and LAN 2 LAN then right-click
8. Select the connection brigde
9. Wait until the connection is completed brigde
On Computer B
1. Log start | Control Panel | Network Connections
2. Right-click the LAN 3 (a computer connected to LAN 2 A) select properties
3. On the General tab select Internet Protocol (TCP / IP) and then select Properties
4. Set the IP addresses manually, enter the IP address use the Following the
IP Address: 192.168.1.4
Subnet mask: 255.255.255.0
Default Gateway: 192.168.1.1
To control the content of the
Prefered: 8.8.8.8
Alternate: 8.8.4.4
6. Once filled out correctly, click OK.
7. Restart the computer
8. Congratulations you have two computers connected to the Internet both!
*) Warning: Notice the difference was no IP Address LAN 1, LAN 2, LAN 3 and Gateway (Have we all give a red color, different is not it? But it's not a rule of thumb, you can customize it)
How to Speed up Internet connection without software
In this information age, information media such as internet speed is very important. Moreover, if this is related to the speed of your internet access as a student, student and as an online business or other internet surfers. Speed is a must! mandatory! and ... should not be negotiable!This computer tips to speed up your internet connection without the software and easy!2 creative tips that you will learn are:
Tip 1: Tweak Registry
Tip 2: Tweak Internet Browser (Mozilla Firefox)

Registry tweaksTweak the registry is done in your windows registry, how:1. Select the start menu then run2. Type regedit in the run dialog windowTips Speed up Internet Connection3. Look for this registry address: HKEY_LOCAL_MACHINE \ SYSTEM \ Current ControlSet \ Services \ Tcpip \ ServiceProvider then work out how to 4-74. Select DnsPriority change the value to 15. Select HostsPriority change the value to 16. Select LocalPriority change the value to 17. Select NetbtPriority change the value to 18. Close the Registry Editor9. Restart Your Computer
Tweak FIREFOX

Tweak firefox used to speed up Mozilla Firefox browser when you open the desired URL, but in doing so you must be very careful and cautious. Here's how:A. In Mozilla firefox type "about: config" (without quotation marks)2. Exit your browser warnings about the warranty, therefore you must be careful in tweaking firefox. Click I'll be careful, I promise!Tips Speed up Internet connection3. Change the value of a setting or if it was not there make your own by right click select New. Integer To select data in the form of numbers, select the Boolean to true / false.For ADSL users:
Set "network.http.max-connections: 64"
Set "network.http.max-connections-per-server: 21"
Set "network.http.max-persistent-connections-per-server: 8"
Set "network.http.pipelining: true"
Set "network.http.pipelining.maxrequests: 100"
Set "network.http.proxy.pipelining: true"
Set "nglayout.initialpaint.delay: 0"For DSL users:
Set "network.http.pipelining: true"
Set "network.http.proxy.pipelining: true"
Set "network.http.pipelining.maxrequests: 64"
Set "nglayout.initialpaint.delay: 0"For users of DIAL UP
Set "browser.cache.disk_cache_ssl: true"
Set "browser.xul.error_pages.enabled: true"
Set "content.interrupt.parsing: true"
Set "content.max.tokenizing.time: 3000000"
Set "content.maxtextrun: 8191"
Set "content.notify.backoffcount: 5"
Set "content.notify.interval: 750 000"
Set "content.notify.ontimer: true"
Set "content.switch.threshold: 750 000"
Set "network.http.max-connections: 32"
Set "network.http.max-connections-per-server: 8"
Set "network.http.max-persistent-connections-per-proxy: 8"
Set "network.http.max-persistent-connections-per-server: 4"
Set "network.http.pipelining: true"
Set "network.http.pipelining.maxrequests: 8"
Set "network.http.proxy.pipelining: true"
Set "plugin.expose_full_path: true"
Set "signed.applets.codebase_principal_support: true"Thus Tricks Computer Tips on How to Speed up Internet connection without the software may help you.
Tip 1: Tweak Registry
Tip 2: Tweak Internet Browser (Mozilla Firefox)

Tweak FIREFOX

Tweak firefox used to speed up Mozilla Firefox browser when you open the desired URL, but in doing so you must be very careful and cautious. Here's how:A. In Mozilla firefox type "about: config" (without quotation marks)2. Exit your browser warnings about the warranty, therefore you must be careful in tweaking firefox. Click I'll be careful, I promise!Tips Speed up Internet connection3. Change the value of a setting or if it was not there make your own by right click select New. Integer To select data in the form of numbers, select the Boolean to true / false.For ADSL users:
Set "network.http.max-connections: 64"
Set "network.http.max-connections-per-server: 21"
Set "network.http.max-persistent-connections-per-server: 8"
Set "network.http.pipelining: true"
Set "network.http.pipelining.maxrequests: 100"
Set "network.http.proxy.pipelining: true"
Set "nglayout.initialpaint.delay: 0"For DSL users:
Set "network.http.pipelining: true"
Set "network.http.proxy.pipelining: true"
Set "network.http.pipelining.maxrequests: 64"
Set "nglayout.initialpaint.delay: 0"For users of DIAL UP
Set "browser.cache.disk_cache_ssl: true"
Set "browser.xul.error_pages.enabled: true"
Set "content.interrupt.parsing: true"
Set "content.max.tokenizing.time: 3000000"
Set "content.maxtextrun: 8191"
Set "content.notify.backoffcount: 5"
Set "content.notify.interval: 750 000"
Set "content.notify.ontimer: true"
Set "content.switch.threshold: 750 000"
Set "network.http.max-connections: 32"
Set "network.http.max-connections-per-server: 8"
Set "network.http.max-persistent-connections-per-proxy: 8"
Set "network.http.max-persistent-connections-per-server: 4"
Set "network.http.pipelining: true"
Set "network.http.pipelining.maxrequests: 8"
Set "network.http.proxy.pipelining: true"
Set "plugin.expose_full_path: true"
Set "signed.applets.codebase_principal_support: true"Thus Tricks Computer Tips on How to Speed up Internet connection without the software may help you.
Friday, March 9, 2012
Windows 7 Always Get Safe Mode

Windows 7 Always Get Safe Mode is annoying because obviously you're stuck in safe mode it continuously. There can be several reasons why your computer boot and Always Go to Safe Mode. Most of the causes for the problem driver or file is corrupt. Running start up repair option from the installation disks often become a way out, but do not always succeed even can seem pointless.
And unfortunately, most users will not have the installation disk or recovery disk system. Before anything is done, let's see if windows automatically be set so that the Windows 7 Always Get Safe Mode.
Option Safe Mode In Windows 7
Windows can be configured to boot in Safe Mode. If Windows 7 stuck in Safe Mode, click the Start button and type msconfig in the search box and hit Enter. This will open the Microsoft System Configuration utility. Look under the Boot tab and make sure the box is unchecked Safe Boot.
Safe boot mode runs on:
Windows 7 Always Go to Safe Mode and settlement
If the Boot options have been tried msconfig, but it does not solve the problem you should try other options to boot normally if Windows Always Get Safe Mode.
If Windows stuck in Safe Mode and you happen to have a full installation disk, try to do a Windows repair:
And unfortunately, most users will not have the installation disk or recovery disk system. Before anything is done, let's see if windows automatically be set so that the Windows 7 Always Get Safe Mode.
Option Safe Mode In Windows 7
Windows can be configured to boot in Safe Mode. If Windows 7 stuck in Safe Mode, click the Start button and type msconfig in the search box and hit Enter. This will open the Microsoft System Configuration utility. Look under the Boot tab and make sure the box is unchecked Safe Boot.
Safe boot mode runs on:
- Safe boot: Minimal. Boot Windows will bring the system into Safe Mode, run the basic system services only once by default. Networking features are disabled.
- Safe boot: Alternate shell: Options Windows Command Prompt boot in safe mode. It also runs a basic system services only once by default. Networking features are disabled ..
- Safe boot - Active Directory repair: Same as the previous two safe boot, but here are running Active Directory.
- Safe boot - Network: Same as the previous three safe boot and additions to the networking is enabled.
- No GUI boot: This will not display the Windows desktop when booting.
- Boot log: Stores all information from the boot process in the file% SystemRoot * Ntbtlog.txt.
- Base video: The system will boot to the Windows desktop in minimal VGA mode. VGA drivers run in standard mode is not specific to the video hardware of the computer.
- Boot OS information: Displays the name of the driver during the boot process
- Make all boot settings permanent: When you activate the option, you can not roll back the changes that you do, when you select Normal Startup on the General tab, all options that you want to change back to be changed manually.
Windows 7 Always Go to Safe Mode and settlement
If the Boot options have been tried msconfig, but it does not solve the problem you should try other options to boot normally if Windows Always Get Safe Mode.
- Try a System Restore. Click Start> Programs> Accessories> System Tools> System Restore, try and reset the computer back to the date on which the computer was functioning normally. You will not lose any data.
- Uninstall any new programs or remove any hardware that was recently added to the computer.
If Windows stuck in Safe Mode and you happen to have a full installation disk, try to do a Windows repair:
- Insert the Windows installation CD in the drive, and then start the computer.
- Press any key when you are prompted.
- Choose a language, a time, a currency, and a keyboard, and then click Next.
- Click Repair your computer.
- Click the operating system you want to fix, and then click Next.
- 6. In the System Recovery Options box, click Startup Repair
- Restart the PC when the process is complete.
Ways to Overcome Computer Too Hot
The computer is too hot and you may not realize it. In addition to viruses, heat is one of the most dangerous threats to your computer. Many users even think that their computers have a virus, because the computer is too hot to have the same symptoms: PC running very slow and may reboot the PC or the computer may crash frequently.
Heat sensor on the new computer, often turning off the computer and force the cooling period before allowing the PC to be powered on again. It is important that users remain aware of the problem of heat and do the upgrade or maintenance of this better before permanent damage occurs to the hardware.
Here's 5 Ways to Overcome Computer Too Hot
These are some improvements that I suggest if you suspect your computer is overheating.
- Perform routine maintenance. Cumulative dust is an invisible killer. This dust clog and slow cooling, dust covered motherboard, video card and other components so that cooling is not working. Every few months, clean the casing and motherboard etc in your computer.
- Consider upgrading your power supply. A traditional power supply will have a tangle of wire-most of which have never been used. This limits the flow of air that can cause overheating. Besides the lack of good Power supply cooling is also not good.
- Evaluate your hard drive settings. Several cases of PC hard drive lets you set directly on top of each other. Hard drives generate more heat. If you have multiple hard drives, you should space them apart, or at least distance apart, in order to allow for better circulation. In addition, if you have an older IDE drive, replace it with a SATA drive interface cable thinner than the broader IDE cable. Even better, when you replace the hard drive, replace it with a Solid State Hard Drive.
- Reduce the number of programs running. Number of programs running will affect the CPU heat. Reduce the program running in the background is a good choice. Unnecessary programs, stop it. Click Start> Run and type msconfig, and press OK. This will open the Microsoft Configuration Utility. Under the Startup tab, remove all the programs you know do not have to run at startup. You may be surprised at how many programs that automatically loads itself.
- Attach an additional fan in the rear casing. Most of the casing has an extra fan, but there has to be added alone. The fan is mounted on the back of the computer, and will help pull the air out of the computer and prevents the buildup of dust in the power supply. The concept is to draw cold air so as to help circulate air over the CPU and the hot air out the back of the casing. But this can also increase the amount of dust coming into the casing. So if you use the front fan, be sure to remove your computer from the floor.
Tuesday, March 6, 2012
Restore Data from any storage device
You continuously require data recovery support any time you missing your data because of storage media obtaining broken, file getting damaged or once you are not able to having access to it normally. Almost all storage media work with hard disk drives and almost all malfunctions occur simply because the issue with hard disk drives. Hard drive recovery frequently includes changing failed or broken parts using special device and software utilities. Broken parts regularly include electronics parts, read/write heads, head assemblies, magnets & disk drive electric motors, and RAID data recovery and so on.
We now have created the most sophisticated technology and apply revolutionary tools; along with the greatest standard of skills. We can manage data retrieval from any storage device. As a consequence, we provide our customers the maximum good results rate of entire data recovery in the industry.
Only DATARECOVERY present the perfect data recovery services. Visit us in 510 Champagne Drive
Toronto, ON M3J 2T9, Canada. Ready to meet most of operating system : Microsoft Windows , Linux , Novell , Macintosh/Apple ,UNIX/Solaris ( Sparc / Intel ) , SCO Open Server Etc . Our file recovery experts restore your missing file from any type of storage device, CD-DVD, Digital Media Memory Card, Laptop or pc, External Hard Drive, Etc. A variety of damaged data from almost all media storage of our clients are restored successfully in Canada.
Friday, February 24, 2012
save a flash animation on a web page
You are interested and want to save a flash animation that is displayed on a web page? Confused how to take it? You can copy the source of the animation file (. Swf) into the computer with the help of flash capture tool.
- Download and install flash capture tool, for example http://flashcapture.zbsoft.net.
- Flash Capture Run, type the URL of a web page that contains flash animation.
- The search process animation files on a web page will be done. The results are displayed in the file list in the left column. Click the link to preview namafile.swf found. Click Save or Save as.
- Check the capture file in the folder C: \ Program Files \ Flash Capture \ Temp \. Now you want flash animation have collected on your computer.
Keyboard shortcuts for Delphi
If you are learning Delphi, here I will give some list of keyboard shortcuts for Delphi
Shortcut Delphi
Code Parameters : Ctrl-Shift-Space
Code Completion : Ctrl-Space
Code Templates : Ctrl-J
Shortcut Class Completion
Class Completion : Ctrl-Shift-C
Class Nav Up : Ctrl-Shift-Up
Class Nav Down : Ctrl-Shift-Down
Shortcut Code Browsing (D6 and above)
Symbol Browsing : Alt-Up
Browse Forward : Alt-Right
Browse Backward : Alt-Left
Shortcut Message Window
Previous Message : Alt-F7
Next Message : Alt-F8
Shortcut IDE Windows
Code Explorer : Ctrl-Shift-E
Project Manager : Ctrl-Alt-F11
Window List : Alt-0 (zero)
Object Inspector : F11
Shortcut Debugger Windows
Event Log : Ctrl-Alt-V
Breakpoints : Ctrl-Alt-B
Watches : Ctrl-Alt-V
Threads : Ctrl-Alt-T
Shortcut TODO List Window
Add TODO Item : Ctrl-Shift-T
Shortcut Editing
Blocking Mode : Ctrl+O-L (line) Ctrl+O-C (column)
Shortcut Debugging
Trace Into : F7
Step Over : F8
Trace to next source line : Shift-F7
Run to Cursor : F4
Run until return : Shift-F8
Program Reset : Ctrl-F2
Evaluate/Modify : Ctrl-F7
Add Watch : Ctrl-F5
Toggle Breakpoint : F5
Shortcut Compiling
Compile Project : F5
Build : Ctrl-F5
Syntax Check : F5
Project Options : Ctrl-Shift-F11
Thursday, February 23, 2012
Download Software detection of computer problems
Computer users, be it one's own computer, office and property belonging to others, will feel comfortable and enjoy working with the computer if the computer is no problem. Instead, the user will be disturbed when the computer hassles and used under conditions that do not fit or in case of error. Error on the computer or PC is a common problem, sometimes not even aware of. Error on the computer may occur due to damage to the hardware (disk, memory, processor and other hardware) as well as on Windows operating system that can be caused by corrupt file system, as well as attacks from malware, soyware, virus or the like.

If viewed from the existing features, this program is similar to the default Windows task manager, the task (running applications), services, startup and system info. Only difference is the more complete this program and plus there is the classification of programs, services are dangerous or unnecessary programs and programs that are safe to remain in operation that are marked with red, yellow and green. Here we can take action to end task, disable, enable at startup directly. However, as a user, for the red color code does not have to disable or delete, we should still consider the advice given by this program. If we knew the program was not dangerous and it is important to our work, although red, still it is not disabled or deleted.
A more complete system is a feature infonya. With this program we can see a complete computer system info once. We can see information about the motherboard, BIOS, CPU, graphics card, Network adapter, Operating system, Antivirus, Memory, hard drive info (IDE / Serial ATA), Drives, COMM Port, Cache memory, TCP / IP Ports and connections, and other so on. In addition to the above features, we can also go to the registry editor, control panel, event viewer, add and remove programs on the tools menu, and there are features on the file menu export the info, print and shutdown, restart or logoff and lock computer.
Program or the application is called The Ultimate Troubleshooter. A thousand pities, this program is not paid or free. But if a friend wants to try the free trial can simply download The Ultimate Troubleshooter to his official website here: http://www.answersthatwork.com/TUT_pages/TUT_information.htm
Origin EON 17-X3D notebooks with Two Graphics Card
Origin some time ago launched a notebook that can serve as a desktop replacement. Notebook has a name EON 17-X3D. As part of its name, this notebook has a screen measuring 17 inches and capable of displaying images with 3D technology!

Origin is not playing called EON 17-X3D as a desktop replacement, this notebook is equipped with highly qualified specs! For the processor, this device will be equipped with the Intel X79 chipset with the second generation of Intel Hexcore. As for the other components, not much different than any other brand gaming notebook, you can customize. You can select the memory up to 32GB of 1333MHz Corsair 16GB 1866MHz Quad Channel or Quad Channel Corsair Vengeance. As for the graphics card, you can choose up to 2 pieces (SLI) NVIDIA GeForce GTX580M already over-clocked. As for the issue of storage media, you can arm the EON 17-X3D with up to 3TB hard disk!
To run the on-screen 3D technology, EON 17-X3D is equipped with a built-in 3D emitter. In addition, in the sales package, you can find two NVIDIA 3D Vision Glasses Wireless 2.
In the EON 17-X3D is also equipped with back-lit keyboard, can help you type in when darkness or just for style only.
How much should you pay for through the EON 17-X3D with the highest specs? USD3.032 enough alone. Want this notebook comes with a different color? You can choose paint colors and specific design, of an additional fee. Interested? You can visit this link to make a reservation.
3D Vision 2: The Second Generation NVIDIA 3D Glasses
NVIDIA today introduced the latest generation of its 3D glasses. 3D glasses that have been entered into the second generation is given the name 3D Vision 2. NVIDIA promises some changes and improvements in these glasses. What are they? Consider the following article!

NVIDIA 3D Vision 2 has a larger lens than the first generation of eyeglasses. 3D Vision lens 2 is 20 percent larger than the first generation. With larger lenses, NVIDIA claims that these glasses can provide a wider image area.
NVIDIA 3D Vision 2 uses a soft material. This causes the weight of 3D glasses is reduced, when compared with the first generation. Of course this makes these glasses increases the comfort level.
NVIDIA 3D Vision 2 uses active-shutter feature. To receive the 3D signal, these glasses are equipped with a wireless IR device.
Apart from the terms of the glasses, NVIDIA also update the display technology. Now, 3D monitor developed by NVIDIA will be armed with the technology LightBoost. By using these technologies, you can enjoy 3D content 2x brighter than ever. In addition, the monitor is equipped with technology that can reduce the effects of ghosting (ghosting).
Along with the launch of these two 3D Vision glasses, NVIDIA also announced any products that have used the latest 3D technology. These products are Toshiba Qosmio X770 / 775, Toshiba Satellite P770 / P775 (fourth series is a product of the notebook) and ASUS VG278H (27-inch monitor that supports resolutions).
2 3D Vision glasses are marketed at a price of USD99 (glasses only) and USD149
Sony Tablet S For Sale in Indonesia
Sony finally launched one of its first two tablet devices to Indonesia. They launched the first device is the Sony Tablet S. Whereas the other series, Sony Tablet P, unfortunately there will be launched in Indonesia in the near future.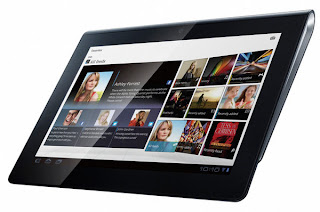

Android based Sony Tablet S Honeycomb 3.2. As you already know, at present, there are so many Android-based tablet devices on the market. The question is, does that make the tablet from Sony is different from the others? Tablet device is equipped with a PlayStation Certified. With the certification, you can play some games on the PlayStation One of these devices. Sony itself has given two games on the Sony PlayStation One Tablet S is. The second game is Crash Bandicoot and Pinball Heroes. If you want medownload PlayStation One game, you can do it through the Android Market.
Another plus to the Sony Tablet S is the access to infra-red remote control that allows you to control all your media devices from just one remote. You can turn on the TV with any brand, any brand DVD player, as long as these devices are equipped with infra-red.
Sony Tablet S has a screen size 9.4 inches (WXGA 1280 x 800). For the problem specification, Sony Tablet S NVIDIA Tegra processors equipped 2, 1GB memory, two cameras (0.3 megapixel resolution in the front and 5 megapixel camera on the back), and WiFi. Unfortunately, these devices are not present in the 3G version.
There are two models of Sony Tablet S which was launched in Indonesia, namely the storage capacity of 16GB and 32GB. Both are on sale from February 29, 2012 at a price Rp4.999.000, - for the 16GB and Rp5.599.000, - for a capacity of 32GB.
Thursday, February 16, 2012
Adobe Unveils Photoshop Touch Application for Android Platform
The development of devices that use a tablet gadget Android platforms on the market increasingly crowded with a variety of brands and also different screen sizes. Apparently, it is utilized as a promising opportunity for Adobe to bring the image processing software of the most favorite, Adobe Photoshop, the Android-based tablet devices. As to whether the ability of an application called Photoshop Touch?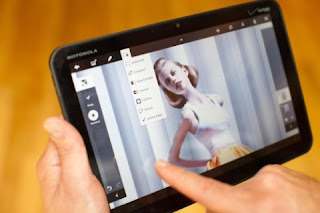
Overall, the application of Photoshop Touch is enriched with a variety of excellent feature for image processing. Some useful tools are available, ideal for users who are still new to Photoshop as well as professionals who are accustomed to using this software. One thing to note, the maximum image file that can be processed by applications, measuring 1600 x 1600 pixels.In addition, the application also provides some guidelines that have been integrated in it which at times can be used in various processes. You can also share the results of the edited pictures to friends and family through social networking site Facebook. One feature that is interesting is that you can see the comments on the pictures you upload to Facebook via Photoshop Touch applications.To the source of the photos, in addition to using a camera mounted on a tablet device, you can get it through Photoshop Touch apps using Google Images and features of Adobe Creative Cloud, which is already integrated in the application. Adobe Creative Cloud feature allows you to upload a picture of the result of a tablet, then you make some changes that are not owned by the software application Photoshop CS5.
Adobe Photoshop Touch, offered at a price of USD 9.99. In addition, Adobe has also prepared a series of applications to be brought to the Android platform, including Adobe Proto, Debut, Ideas, and Kuller, that each of these applications will be offered at a price of USD 9.99 when it launches.Please refer to the following video tutorial on Photoshop Touch applications processing techniques on the tablet which was hosted by Russell Brown
Android malware 2012
Over time, Android is constantly increasing in terms of market share. Drastically increased the market share of Android did not escape the attention of cyber criminals. In 2011 the last, the real threats to the Android is starting to look. Many malicious applications that infiltrate the operating system made by Google. What about 2012? In 2012 a new beginning, but the threat of malware on Android already started popping up!

One of the attacks against Android recently occurred in France. An attack of this Android.Qicsomos named deceive victims who want to find and remove the controversial application of Carrier IQ. Interestingly, Symantec security team was not able to find traces of these false applications in the Android Market. This application is spreading as spam or phishing campaign of an operator in Europe to ask the victim to download and run the application. When running the application, Carrier IQ is not obtained, but the smartphone will send an SMS to a premium number!
The threat is characterized by a certificate issued as part of the Android Open Source porject (AOSP). This allows the application to a particular device is installed on the screen without having to go through the normal licensing notice, which is the primary defense mechanism to face dangerous applications.
Previously, the Android Market there are some rogue application masquerading as popular games. The application under the name "Steven Creek Software". When you are finished installing the application in this evil, then there will be a key to be pressed to complete the installation. However, it turns out the button will take you to the internet browser and take you to a website Online Income Solution.
Removing unwanted photo objects in android phone
Nothing is more fun than having pictures as we want. Usually, when we take a photograph in the crowd, we regret many things, such as those that appear in the photo but in a state of blur, the existence of some objects that are not eye-catching, and others. To eliminate some of the objects that interfere with the course takes a long time using a photo editor on the PC. But now, you could even do it on your Android smartphone.
Developer applications, Scalado, developed a brilliant application called Remove. As the name implies, this application serves to get rid of objects that are considered disruptive (including people!). This allows people to be able to take pictures in a place without having to wait for the place was deserted.
step 1: take pictures anywhere you want.

These applications take several photos at once, analyze, and combine them in order to be edited by the user. Basically, this application works like a camera app in general. Users only need to press the shutter button and the application will automatically take multiple photos at once. Then, this application will provide the images to highlight some of the objects so that users can "move it" into or out of the picture.
Step 2: This application will directly detect the existence of objects in an image, highlight it, and lets the user move objects into or out of the picture.

Until now, these applications are still in the prototype stage. However, Endagdet stated that this application works with an intuitive, although there are still some problems with the response and minor bugs that appear in its interface. The plan, this application will be showcased at Mobile World Congress later this month.

Objects that do not want anything missing from the picture!
DOTA 2 will support LAN mode
Erik Johnson - head of the project DOTA 2 from Valve confirmed this. Johnson delivered the good news that has been eagerly awaited by gamers around the world, that DOTA 2 will support the mode for LAN Party! This news is certainly a relief to gamers who are more comfortable during or just have enough facilities to enjoy a competition in LAN. Valve also reported that they are currently focused on building a server that is more adequate for those who want to play DOTA 2 online. More distant targets? They would like DOTA 2, as Skyrim of Bethesda, was able to develop due to an active community, including making modifications.

Internet network is rapidly growing and developing it also has an effect on how the gaming industry. In addition to multiplayer mode phenomenon that is now often become the focus of a game, the Internet is also regarded as a safety net of the most qualified to tackle piracy. This is evident from the success of some games like Starcraft II and Battle.net their systems. Unfortunately, this system comes with its own weaknesses. Gamers with a bad internet connection will not be able to play this game. Worse, they eliminate the LAN mode to compete. For those of you who had worried that the latest games from Valve - DotA 2 will carry the same system, you may smth heart.
No doubt, the opportunity to play LAN mode is of course also be good news for DotA community in Indonesia. What article? In addition to the experience of certainty DOTA 2 more leverage and is not blocked by the internet connection in Indonesia is not very stable, LAN mode also opens up vast opportunities for piracy. Without the need to connect to a particular official portal and through the verification process ala Battle.net, DOTA 2 opportunities for counterfeiters to feel the game features in the maximum.
Subscribe to:
Comments (Atom)