Showing posts with label Windows 7. Show all posts

Friday, March 9, 2012

Windows 7 Always Get Safe Mode

Windows 7 Always Get Safe Mode is annoying because obviously you're stuck in safe mode it continuously. There can be several reasons why your computer boot and Always Go to Safe Mode. Most of the causes for the problem driver or file is corrupt. Running start up repair option from the installation disks often become a way out, but do not always succeed even can seem pointless.


And unfortunately, most users will not have the installation disk or recovery disk system. Before anything is done, let's see if windows automatically be set so that the Windows 7 Always Get Safe Mode.
Option Safe Mode In Windows 7
Windows can be configured to boot in Safe Mode. If Windows 7 stuck in Safe Mode, click the Start button and type msconfig in the search box and hit Enter. This will open the Microsoft System Configuration utility. Look under the Boot tab and make sure the box is unchecked Safe Boot.
Safe boot mode runs on:

  •     Safe boot: Minimal. Boot Windows will bring the system into Safe Mode, run the basic system services only once by default. Networking features are disabled.
  •     Safe boot: Alternate shell: Options Windows Command Prompt boot in safe mode. It also runs a basic system services only once by default. Networking features are disabled ..
  •     Safe boot - Active Directory repair: Same as the previous two safe boot, but here are running Active Directory.
  •     Safe boot - Network: Same as the previous three safe boot and additions to the networking is enabled.
  •     No GUI boot: This will not display the Windows desktop when booting.
  •     Boot log: Stores all information from the boot process in the file% SystemRoot * Ntbtlog.txt.
  •     Base video: The system will boot to the Windows desktop in minimal VGA mode. VGA drivers run in standard mode is not specific to the video hardware of the computer.
  •     Boot OS information: Displays the name of the driver during the boot process
  •     Make all boot settings permanent: When you activate the option, you can not roll back the changes that you do, when you select Normal Startup on the General tab, all options that you want to change back to be changed manually.

Windows 7 Always Go to Safe Mode and settlement
If the Boot options have been tried msconfig, but it does not solve the problem you should try other options to boot normally if Windows Always Get Safe Mode.

  1.     Try a System Restore. Click Start> Programs> Accessories> System Tools> System Restore, try and reset the computer back to the date on which the computer was functioning normally. You will not lose any data.
  2.     Uninstall any new programs or remove any hardware that was recently added to the computer.

If Windows stuck in Safe Mode and you happen to have a full installation disk, try to do a Windows repair:

  •     Insert the Windows installation CD in the drive, and then start the computer.
  •     Press any key when you are prompted.
  •     Choose a language, a time, a currency, and a keyboard, and then click Next.
  •     Click Repair your computer.
  •     Click the operating system you want to fix, and then click Next.
  •     6. In the System Recovery Options box, click Startup Repair
  •     Restart the PC when the process is complete.

Thursday, December 22, 2011

Intel stop producing Celeron and Centrino


Intel is now producing a new product to replace the old Celeron and Centrino products. The arrival of a new family of Intel, i3, i5 and i7 chip manufacturers are making ready to stop the production of chip cards and Celeron Centrino platform.

"The arrival of the chip family 'i' is indeed to replace the previous product, Celeron and Centrino. But gradually, because there is transition. We do not want to disappoint an already purchased the old chip," said Country Manager Intel Indonesia Budi Wahyu Jati, the launch of the latest Intel at Blowfish, Jakarta, Tuesday (19/1/2010).

Although gradual, Budi sure if the chip with the code 'i' will soon be replaced until the end of 2010. In fact he was sure, the previous-generation platform will be discontinued soon.

"We will stop the production of Celeron and Centrino in mid year, so until the end of the year everything will be using this new chip," he said.

Intel Core i3 is the Intel line of processors aimed at the low end segment. In addition to friendly price, the chip technology is also not less good.

Intel Core i3 present in Indonesia in two variants namely, 540 and Core i3 i3 530 which both have been using the LGA 1156 socket with a price range of USD113 to USD133.

Meanwhile, After wara-wiri at the Consumer Electronics Show 2010, Indonesia finally accomplished also enjoy the treats of Intel's latest family of Core 2010. No half-hearted again, threw Intel 3 series processors, starting from the Core i3, i5, and i7.
"These three new family of Intel Core processor 2010 is a response to computer users in Indonesia, ranging from the casual user, to the mainstream," said Country Manager Intel Indonesia Budi Revelation Teak, on the sidelines of the launch, the Blowfish, Jakarta.

Although tailored to its needs, it does not mean ignoring Intel embedded technology. Because this hardware manufacturers still provide a benefit that is different from previous generations. One of i3, which began to be produced using the process of mass manufacturing of 32 nanometer (nm) which is the first time, and a new breakthrough.

"With high-K metal transistor second generation of Intel, the computer allows higher speeds, but still energy efficient," said Budi.

As for the Core i5 and i7, Intel has also pinned a new technology called Turbo Bost and Intel Hyper Threading Technology. Through this technology the computer does not become hot. Budi explained, Turbo Boost works when the computer has loaded, so the frequency goes up and each core was also up in turn.

"The combination of the latest chips from Intel's Core is making Windows 7 to be more efficient and more multitasking. This is of course to maximize the use of computer users, especially users of Windows 7" said Chief Officer of Microsoft Indonesia Faycal Operartion Bouchlaghem.

Interestingly, Intel seemed to understand the changing trends, especially in the areas of graphics, which is currently so adored sharp images High Defintion class. Because it is in this Core Intel processor chip called the Intel HD graphics. Thus, the 3D image display quality and HD can run maximum.

Thursday, December 8, 2011

How to Speed ​​up Windows 7 Boot

If you are running Windows 7 or Windows Vista, you can speed up Windows boot by using the tools in Group Policy Editor. Facilities on this one I love because there are many options in it including improved start up time. Menghapus start up programs using MSCONFIG is a great way to start reducing the burden, but not all can be deleted because there are certain parts that can not be disabled. So if you are running windows 7 edition of the Professional, Ultimate or Enterprise, use the Group Policy Editor helps start up time.

These are some steps how to Speed ​​up Windows 7 Boot

The first step is you have to get Group Policy Editor in the control panel. Unfortunately this facility is not on the version of Home and Starter Edition. Click the windows, and in the dialog box type: gpedit.msc and click [OK].

Please navigate the pointer to [Computer Configuration]> [Administrative Templates]> [System]> Troubleshooting and Diagnostics]> [Windows Boot Performance Diagnostics].


Next double-click [Configure Scenario Executio level]. Please [Enable] this facility. Furthermore, under the column [Scenario Executio level] Please click the drop-down arrow and select [Detection, Troubleshooting and Resolution].

In order for this facility works, Diagnostic Policy Service in the state must start. After that the facility is running, but to make sure check the Administrative Tools section of the control panel. Look in the Services and make sure the DSP in running position.

  The above steps should be able to speed up Windows boot time. That is one way Accelerate Boot Windows 7

Thursday, November 24, 2011

Free eBook: Windows 7 Power Users Guide


Windows 7 which is the latest operating system from Microsoft offers many advantages when compared to Windows Vista or Windows XP. You who previously used an older version of Windows may need additional references to understand more about Windows 7. One source of reference that you can choose is a free ebook Windows 7 Power Users Guide written by Mike Halsey.

This ebook consists of 174 pages and 16 chapters, in which clear about the ins and outs of Windows 7. The discussion from how to install Windows 7 (both new install or upgrade from Windows XP or Windows Vista, how to network configuration, maintenance, tweaking down to how to fix the errors that commonly arise.

You do not need to be confused to learn this because this ebook ebook explains in detail step by step which is equipped with a screen shoot and a variety of quick tips.

If you are interested in reading and studying the ebook you can download here
http://www.lulu.com/product/ebook/the-windows-7-power-users-guide/15662737.

Details book:

  • Copyright: Mike Halsey, www.theLongClimb.com (Standard Copyright License Edition: First Edition
  • Publisher: Mike Halsey, www.theLongClimb.com
  • Publication Date: May 6, 2011
  • Language: Bahasa
  • Number of Pages: 174
  • File Format: PDF
  • File Size: 24.2 MB

Friday, November 11, 2011

how to use Partition Magic 8.0

Many people think if we want to partition the Hard Disk (HD), can use the default Windows XP CD. I did not know it could or not. But rather than be bothered to enter the Windows XP CD-set and set all kinds, better use partition manager applications. Lots partition manager applications, such as Parted Magic (Live CD but it's, yes the same thing ...) or Partition Magic. Here I will explain how to use Partition Magic.

If we do not have that application, or it can be downloaded here.

For those who want to know how to use Partition Magic, the following guide to install it:
  1. Open the folder Partition Magic Pro 8.0 that you downloaded, please locate the file Setup.exe, and then run
  2. Wait until installation is complete preparation process
  3. After the preparatory process is finished, it will show PartitionMagic 8.0 Setup window. Click on Next.
  4. Fill in the User Name, Company Name and Serial Number you have (for user name and company name are free), then select Next
  5. Then select Yes to give approval to the License Agreement is displayed.
  6. Then select Next (3 times) until the installation process starts automatically
  7. After the installation is complete, it will be asked whether you want to create a Rescue Disk? For this example we ignore the offer by selecting No.
  8. Dispose 2 check the box that was / is checked on the window that appears, select Finish

Now that your computer has been installed PartitionMagic 8.0. For the next step, let's make the partition a hard drive with the help of the software.
How to create a disk partition with Partition Magic 8.0:

  1. Run PartitionMagic 8.0 software
  2. After PartitionMagic 8.0 window appears, click the name of your disk (Disk 1) on the right side of the window PartitionMagic 8.0
  3. On the pick a task ... (see top left window PartitionMagic 8.0) select Create new partition's
  4. Continue to select Next to continue
  5. Select the hard disk to be our paritisi, then Next
  6. Then please select the location of the partition, for this example please select After C: (Recommended), then select the HD who wants to be partitioned
  7. Now determine the magnitude of the desired partition size based on the information to the right of the box (Maximum Size & Minimum Size), then select Next
  8. Once we determine the magnitude of the partition, it will display the approximate partition hard drive as per the data you entered earlier. If you are sure to partition your disk size please select Finish
  9. Now please click the Apply button at the bottom left window PartitionMagic 8.0
  10. If a confirmation window appears, please select Yes or OK to begin the process of partitioning

After 10 steps above you do, Windows will restart to begin the process of partitioning your hard drive, please wait until that process is complete.
Caution: When entering the partitioning process, do not press any button after you restart your computer, to avoid the failure of the partition process.

Monday, November 7, 2011

Recommended Sites to Download Computer Driver

Perhaps you have never experienced anything like the old computer and when you want to reinstall the OS, but do not know the driver CD or floppy disk where it has disappeared? or you buy a used computer that is not its driver or you lose your Driver CD you buy a new computer? Do not you confused, now there is a solution, if you're into cafe or borrow a friend's computer, office, or anyone connected to the internet, you will most likely get its driver. There are several sites that intentionally providing drivers with a new long until such driver VGA, Sound Card, Network Card, CD / DVD-ROM / RW and others. Here are the websites that provide these drivers we surveyed a fairly complete and should be recommended to you:

1.Driver Guide : http://www.driverguide.com/
The site is arguably a complete site because it offers a variety of drivers for many devices and has received many awards such as PC Magazine and PC World. You must register in advance to be able to download the drivers you are looking for - Number of Drivers, firmware, utilities, and manuals there are about 438.458 - There are facilities for search driver wizard - Members join free - Free Software (toolkit, repair, utility) for the download.

2.Driver Zone : http://driverzone.com/
This site offers drivers a more simple search and efficiently without the need to register first. This site is a kind of search engines like google in the search for drivers who were divided into two ways a search, the first is to find the name of the manufacturer of hardware and a second search for a name or serial number of the product you are looking for its driver. In addition, you can simply click on the icon you are looking for drivers directly to search manually.

3.Driver Files : http://www.driverfiles.net/
The site is almost the same as Driver Zone site by offering free drivers without pay and does not need registration, you simply search directly with the search facility or manually.

Friday, October 14, 2011

ReadyBoost increase your computer memory


When your computer runs slow on the RAM for the applications that you run the course will make you really annoyed the computer will automatically get the memory from the hard drive of course it does not work optimally to improve overall performance. This way also I've ever discussed here by using the Virtual memory stick but this is more simple ways you can use one of the ways that I write this.


To overcome this you can try the following trick for users of Windows 7 by using ReadyBoost is a feature in Windows that uses flash memory from a USB flash drive that will help when you walk past the computer RAM.

The way you plug the USB flash drive, after you installed the USB then go to My Computer in Explorer window then right click on the USB Flash Drive

Note: if there is a file on your USB Autorun then ReadyBoost should be the main menjadipilihan

Right click on your USB flash drive then select Properties Properties window will appear in the window menu select the ReadyBoost tab

Optimized Using readyboost ReadyBoost to improve computer memory andakemudian select the Use this device and please set the space to reserve the space you want to use USB Recommends notice on your USB space and click OK.

Note to use this way to make sure your USB possess a minimum capacity of 1 GB, for best results if you use 2 GB of RAM on your computer can use a USB flash drive 2 times the RAM on your computer to get better results.

download Readyboost :

Friday, October 7, 2011

Claremont, Processor with Super Power Save

Intel introduces some future computing concepts in day-to-3 Intel Developer Forum 2011 at the Moscone Center West, San Francisco (15 / 9). One of them is Claremont.


The presence of two days ago Claremont enough to invite attention, mainly because of the power saving capability.

As demonstrated two days ago, the Near-Threshold Voltage Processor is able to work only with the supply of power from solar cells the size of a postage stamp. A new circuit developed Intel Labs allows transistors to work at the turn-on voltage (threshold).

But this is not thought to slow the processor works. In the light workload conditions, power consumption is decreased up to 10 milliwatt, but their performance improved immediately when needed. In a guided demo that Justin Rattner (Intel CTO), the processor code-named Claremont is able to run the game Quake with Windows OS.

As disclosed Intel CEO Paul Otellini, Claremont yet to be realized. But it is quite possible if the Intel integrated circuits near-threshold voltage in the range of its products later. In addition to pressing the power consumption five times lower, the ability of this kind can support the always-on features on a variety of computing devices.

On the memory, power efficiency is done by Hybrid Memory Cube. Configuration memory chips stacked up to form a cube and use the interface is very efficient so as to save power up to 7-fold, without interrupting the data transfer process. Collaboration between Intel and Micron will be very beneficial to the server cloud, ultrabook, television, tablets, and smartphones.

Wednesday, August 31, 2011

Google Translator Client for Windows

Generally, each time finding the words of the sentence instead of the language, you open up Google or another translator and then try to turn it into your language. Transmiti is a new freeware tool for Windows which is a client of Google Translate. Transmiti makes it easy to translate every word into your language by clicking a button. You can just select the text in the application or window and press the Windows key on your keyboard to pop up a small dialog with the translation.

English Guide Google Translator Klien untuk Windows


Google Translator Classic Guide to WindowsAnda Clients can select the language that needs to be translated using the settings.


Google Translator Client for Windows:


  • No installation is necessary. No administrator privileges or power-user needs.
  • All languages ​​are supported, where Google Translator can afford.
  • Optionally, the selected text will be replaced directly with the translation.
  • Automatic two-way translation and target-language sources.
  • Single words or phrases can be searched in the "Google translate".


Download Google Translator Client for Windows http://www.transmiti.org/en/index.html

Thursday, August 11, 2011

ShutdownGuard: Preventing Application from Windows Shutdown or Restart

There are many applications that lead to shutdown your Windows when you do something else and eventually you lose your unsaved work. ShutdownGuard is a freeware application for Windows is trying to prevent the application to shutdown, reboot or log off the computer.


So next time an application attempts to restart the PC, you get a notice that the screen shutdown or restart prevented by ShutdownGuard. For Windows XP users, the notification is from the system tray.


Preventing Apps from Windows Shutdown or Restart the ShutdownGuardPerhatikan that ShutdownGuard will not be able to prevent all the shutdowns, because some programs explicitly tell Windows to force the shutdown. This means that some programs will still be able to shutdown the computer.

Mencegah Apps dari Windows Shutdown atau Restart dengan ShutdownGuard

There are several settings that can be configured in the configuration file. You can add a customized message when shutdown prevented.


ShutdownGuard not require administrator privileges and you can add to the list of start-up until monitoring begins automatically.

ShutdownGuard


will by default check when the latest version available and will inform you if we find the latest version, you can also check for updates manually in the menu tray, regardless of this setting.


Download ShutdownGuard

http://code.google.com/p/shutdownguard

Saturday, August 6, 2011

Phone Features Windows Mango Revealed

Features on mobile Windows Mango finally revealed. The ability to chat with your friends via Xbox Live is one of the new imported feature to update your Windows Mobile phone features a Mango.

In addition, the OS will also come a firmware update that will support the operating systems on Windows Phone (WP) 7.5, which will be issued in the autumn of this year.


More than 500 new features will be coming up with an update on Mango. This includes the integration of new who connected with Twitter and Linkedln, technology 3D will also be enhanced and software internet Exploler 9 will also be included with it, however features almost the same as the PC.

Here's an update feature that will be coming to WP 7.5 or known as Mango:

1. Streaming video or music content from the web browser of your mobile phone will continue to light up even if the user opens another application or put your cell phone in sleep mode.

2. expansion of Xbox Live connectivity such as voice chat with other users on Xbox Live can be present or updating the hosting Xbox Live can even play online games on the Xbox 360 that is real-time linked with player console.

3. integration of Facebook more deeply, which associate user login directly to your mobile phone, in order to eliminate having to login repeatedly.

In other words, Mango looks to be a hack update. Things to worry about is the scheduled update will be issued or not. The reason until today Microsoft did not yet have a record of stars making software updates WP at this point.

Tuesday, August 2, 2011

Widgets Digital Clock-skin for Windows

Horloger 1.0.0 is a free widget that offers a variety of cool desktop clock, which displays the skin aero glass, semi-transparent and Windows phone 7 hours by type. Consists of 5 skin and has support for 10 languages. One can change the date time format &, transparency, and positions the screen easily from the settings menu. You can also set the position of the manual for the clock and Key it so cant move involuntarily.

Support – Windows 7 and Vista [x 86 x 64 &] and Microsoft Net Framework 3.5 SP1.

You are interested please visit the following link to download the Windows Clock Widget Horloger.

http://www.deviantart.com/download/206066131/horloger_v1_0_final_by_amine5a5-d3eopn7.zip

Repair Windows 7 Blue Screen

There are several events that result in blue screen one is blue screen error STOP: 0x0000006B on Windows 7, sometimes people feel frustrated when it came to blue screen and some of the user's computer when the blue screen do reinstall Windows. But if you are having problems with the above code you can try this way.

Microsoft has identified a problem in Windows 7 that crashes (BSOD) during the process began with a STOP: 0x0000006B error message and fail to boot. The full error message looks like below,

Blue Screen


STOP: 0x0000006B (Parameter1, Parameter2, Parameter3, Parameter4)
This occurs because the PROCESS1_INITIALIZATION_FAILEDMasalah file is corrupted or Bootcat. cache because the cache file size changed Bootcat. Since the beginning of the last successful star up Windows. Fortunately Microsoft has released a fix for this problem in Windows 7 Service Pack 1.

But if you don't want to download Windows 7 SP1 you can use the following simple way to start the computer running a Windows 7 bootable from the hard disk or from a USB drive using the Windows installation media and then you delete the file cache, and the Bootcat. and then restart the computer. The File cache is located in Bootcat.

% SystemRoot% \ system32 \ codeintegrity

For more details you can read here

http://support.microsoft.com/kb/981833/

Repair corrupted files due to Virus attack

Your important documents can be damaged by virus attack or system crash, failure of the application and also the network error. But you can also repair a damaged file with a simple freeware tool which can repair a corrupted file in such cases.

This is a powerful tool to repair your damaged files. Scan of the damaged file and extract the maximum from data to a file that can be used. This application supports various file formats and document and has a simple interface to fix.

You only need to specify the folder where you have a damaged document and the application automatically starts to process them.

Support File Formats;

Word documents (doc, is corrupted. Docx,. Docm,. Excel Spreadsheet (Rtf). Xls, XLA, ... .Xlsx) Zip or RAR archive (. Zip,. Rar) Video (avi, ... Mp4,. Mov,. Flv, wmv, ... Asf,. Mpg) JPEG, GIF, TIFF, BMP, PNG, or RAW images (jpg, ... Jpeg, gif, ... Tiff,. Bmp,. PDF Document (Png). Pdf) Access databases (mdb, ... Mde, accdb, ... Accde) PowerPoint (ppt, ... Pps, pptx).Music (mp3, ... Wav)

Download File Repair

http://www.filerepair1.com/files/file-repair-setup.exe

Friday, July 29, 2011

Dynamic Disk Manager Free Partition Manager for Windows

Dynamic Disk Manager Free Partition Manager for Windows If Partition Manager is the default in Windows 7 is basic and doesn't allow for advanced resizing or managing partitions. There are many free disk manager for Windows includes a Partition Manager EASEUS Partition Master Free and.

Dynamic Disk Manager is a new freeware tool is in beta and allows you to manage partitions on Windows. This application is compatible with Windows 7 and allows you to easily manage, create and change the size of the partition.

Note: the application is currently still in beta testing phase, so if you want to use you could try but only for testing purposes.

The application interface is pretty simple and comes with a feature along with a list of all available partitions on your PC and then you can select any task for a particular partition by selecting. This gives you full control over your PC & Server to maximize the use of disk space and optimize the performance of the computer to its full potential.

The main feature of this application;

Resize dynamic disk to fix the structure hard driveMengecilkan/Extend dynamic volumes with sederhanaMemperpanjang dynamic system volume for the unallocated space to set up the spaceMenindahkan slice dynamic volume configurationAdd drive for Software RAID 0 and RAID-5Remove drive from Software RAID 0 and RAID-5Mengkonversi a basic disk to the GPT disk to MBR dinamisMengkonversi a disk and vice versa

The beta version will expire on July 31 and the final version will be released in August. The developer has said that the application will have a home version will be provided as freeware.

Home

http://dynamic-disk.com/ddm-beta-testing.html

Download Dynamic Disk Manager

http://www.dynamic-disk.com/down/DDM_Beta.exe

Tuesday, July 5, 2011

Intel Atom Cloverview for Windows 8

Parties Intel acknowledged that it was preparing a Cloverview Atom processor and Clover Trial coincides with the advent of Windows 8.

As quoted by Electronista, Tuesday (28/06/2011), "Intel hopes that the chips and software upgrades can increase the power of Microsoft software for Windows 8 ARM," said Bill Kircos, Public Relations Director of Intel products and technologies.
Windows 8 (foto : Google)
Intel also plans to get the Atom architecture in many models use Atom in 2012 as in tablets, netbooks, slider device and other future products that build on the Atom chip 32nm (nanometers).

Furthermore, Intel hopes will reduce power consumption and increase the battery usage. Clover Trail is currently expected to appear in early 2012 to combat the threat of quad-core NVidia "Kal-El" and the ARM Cortex A15, not to mention Apple's future chips that may be developed better for 2012.

Kircos said, "Platform Cloverview will meet or Windows 8 to win the international market, and can provide a more compelling reason for consumers to upgrade to newer hardware."

It seems that the appearance of Windows 8 will have a complete package with sophisticated technology as described above. However, we still have to wait for the operating system is released by Windows

Thursday, June 30, 2011

How to fix Ntoskrnl.exe is missing

Ntoskrnl.exe is missing or corrupt, this message usually appears when Windows fails to boot or not boot. Ntoskrnl.exe is usually located in C: \ Windows \ System32 \ ntoskrnl.exe. boot failure due to ntoskrnl.exe is missing or corrupt it may be caused because the file ntoskrnl.exe tercorrupt or missing.

To restore the file ntoskrnl.exe, way below might help you are experiencing problems fail to boot because ntoskrnl.exe is missing or corrupt.

  • Prepare your Windows XP CD
  • Boot using your Windows CD.
  • At the moment came the command "press any key to boot from the CD", press any key on the keyboard.
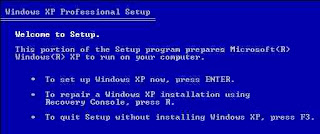
  • On the next screen is the welcome to setup, press the "R" on your keyboard to enter the Recovery Console.


  • Choose one of the Windows OS that is installed.
  • Enter your administrator password and press enter.
  • Type expand d: \ i386 \ ntoskrnl.ex_ c: \ windows \ system32 then press enter. (assuming that d: \ is your CD Rom and the directory c: \ is the partition where Windows is installed)
  • If any warning or message, type Y and press enter
  • If you are finished typing exit to exit and restart the computer.

Saturday, June 18, 2011

How to disable Autoplay Flash disk in Windows 7

Usually when we plug the flash disk to the computer, or we enter into cdroom cd, then the autoplay window will appear that asks us to open such files or the drive automatically. Of course this could be a gap for entry of virus into the computer when a flash or a cd that had been infected with a virus inserted. It would be very detrimental to us as computer users / owners of computers. Would that every flash is plugged in or the cd is inserted into cdroom our first scan with the antivirus updates. No compromise with the virus, Do not let the virus get into our computer. Better to prevent than cure.


To disable autoplay in Windows 7, the following steps:

  • Go to group policy editor by clicking [start]> [run]> type "gpedit.msc"> [enter]
  • In the computer configuration, select "administrative templates"> [all settings].
  • In the right pane, scroll down and locate the "turn off autoplay".

  • Once found, double click on turn off autoplay. In the window that appears click on the radio button [enable]. And in the options, turn off autoplay on: select "all drives"

  • Click [Apply] and [OK].
  • Do the same on the user configuration. (Numbers 2-5)

Having done the above, each of us plug the flash disk and insert a cd into cdroom, autoplay will not appear again.