Friday, March 25, 2011

Tips to restore files and folders hidden by viruses

Sometimes we find our flash blank when viewed using Windows Explorer, but when viewed in Properties, apparently full capacity utilization. Well .. if you meet these conditions, be thankful you're data is still there but hidden in the (hidden). Cases like this usually happens because the virus hides files and folders, so it takes a special trick to bring it back. As for how to restore a file or folder that is hidden (is hidden) by the virus are:

1. First open Windows Explorer and enable the option "show hidden files and folders " menu by going to TOOLS - FOLDER OPTIONS - VIEW, then select "show hidden files and folders ".


Folder Option


5. OK, we try to check the current contents of a file or folder is hidden by the virus in our flash, we assume here F is the flash drive. Type the following command "F:" and then press ENTER, the command is useful to move the prompt to drive F.


command prompt

6. To view any file or folder that dihidden on drive F (flash), use the command "dir / ah"

Then we will be able to see any files or folders are hidden by the virus in the flash us. Here there are 2 folders and 1 file in the hidden condition, ie the folder "DATA-IMPORTANT", "DATA-TA" and "task-akhir.doc".

7. Now we will use the command "attrib" to bring back the hidden files and folders last. Here exemplified to bring back the folder "DATA-TA" and files "task-akhir.doc". The command "attrib" that need to be typed here are:

F: \> attrib.exe-R-H-S / s / d DATA-TA

Attrib

The above command will bring back the folder "DATA-TA", to bring up the file "task-akhir.doc" we use the following command:

F: \> attrib.exe-R-S-H-akhir.doc task

attrib

8. To ensure the folders and files had reappeared, please do you see using Windows Explorer.

windows explorer

9. Congratulations ... your data has appeared again ..

notes:
- To bring up the Folder use the command: "attrib.exe-R-H-S / s / d-folder name
- To bring up the Folder use the command: "attrib.exe-R-S-H-full-file name

Hopefully this article provide benefits


How to fix error "NTLDR is Missing" in Windows XP

Sometimes we see our Windows XP computer can not boot anymore and the error message "NTLDR is Missing". This happens because it is missing or corrupt files of the following:

* NTLDR
* Ntdetect.com
* boot.ini

To overcome the error "NTLDR is Missing" can be done with the guidance provided by Microsoft. This way I have tried myself and prove it.

Microsoft : Generally there are 2 methods to resolve this NTLDR issue.

A. Manual File Re-Patching
This method attempts to copy and replace the corrupted file from the Windows Installation disc to your hard disk. To start, follow these steps:

1. Insert the Windows XP CD into your computer as default boot up media.
2. Enter Windows Recovery Console
3. At the command prompt, assuming drive D refers to your CD Drive, type in the following and hit Enter:
Press Y when prompted to overwrite any existing file.
* copy D:\i386\ntldr C:\
* copy D:\i386\ntdetect.com C:\
4. Restart the computer

If the error message still persist, it is likely that your boot.ini file is corrupted. Try to fix your corrupted boot.ini file instead. Follow the next step.

B. Manually Editing the Boot.ini File

1. Boot from your Windows XP CD in your computer
2. Enter Windows Recovery Console
3. Type in: type c:\Boot.ini
This command checks for a valid Boot.ini file. If your boot file is working fine, you should see like the following:

[boot loader]
timeout=30
default=multi(0)disk(0)rdisk(0)partition(1)\WINDOWS

[operating systems]
multi(0)disk(0)rdisk(0)partition(1)\WINDOWS=”Microsoft Windows XP Professional” /fastdetect

4. If you receive the following error messages instead of the above message being displayed, your boot.ini file is corrupted or missing:
* The system cannot find the file or directory specified
* File not found – boot.ini

5. To write a new boot.ini file, follow these steps:
* Type in: edit.com
The MS-DOS editor will launch.
* Type in the following and save it as a boot.ini

[boot loader]
timeout=30
default=multi(0)disk(0)rdisk(0)partition(1)\WINDOWS

[operating systems]
multi(0)disk(0)rdisk(0)partition(1)\WINDOWS=”Microsoft Windows XP Professional” /fastdetect

IMPORTANT: partition(1) refers to your first partition of your hard disk which Windows is typically installed on. You may need to change the value if Windows is installed in a different partition.

6. Reboot your computer and the problem should be resolved.


Wednesday, March 23, 2011

How to Install And Configure Apache on Ubuntu

If you intend to create a web server (or streaming server) on your Ubuntu machine, apache is an important module that must be installed. In following this tutorial how to Install And Configure Apache on your Ubuntu.

Install apache into your Ubuntu is easy enough using either the Synaptic Package Manager, Software Center Ubuntu, and install "apache2" module. Or, you can open a terminal and type the following command:

sudo apt-get install apache2

After installation is complete, open a browser and type to "http://localhost" URL. If you see the words "It Works!", then your apache installation succeeded.

Furthermore, Apache Configuration

After you install Apache, it will be added to the list of init.d and will automatically start each time you boot up your computer. The following command allows you to start, restart, stop Apache.

sudo / etc/init.d/apache2 start # start apache

sudo / etc/init.d/apache2 stop # stop apache

sudo / etc/init.d/apache2 restart # restart apache


To prevent Apache from auto start at boot:

sudo update-rc.d-f apache2 remove

To return back to auto start Apache type the following:

sudo update-rc.d apache2 defaults

Note: The above command will work on debian-based distros (including Ubuntu).

Changing the default folder localhost

By default, Apache will operate in "/ var / www"folder. This means that whatever you place the files in / var / www folder will be visible from the http://localhost URL. In some cases you might want to "localhost" to point to another folder instead, eg / home / user / public_html. Here's how to do it:

First, make sure / home / Damien / public_html folder exists. Create a simple html file, the name of index.html and place it in public_html folder.

Open a terminal and type:

gksu gedit / etc/apache2/sites-enabled/000-default

Change DocumentRoot / var / www to DocumentRoot / home / user / public_html.

Change to.


then Restart Apache

sudo / etc/init.d/apache2 restart

Now, in your browser, Reload the URL http://localhost. you should see your html file that has been placed in the public_html folder.


Sites of different configurations

Way above allows you to change the default folder apache operation, however, some of you may not want to override the default settings. An alternative is to create multiple sites and apache leads to the active site.

Create a new settings file for your new site.

sudo cp / etc/apache2/sites-available/default / etc/apache2/sites-available/site1

Next, edit the settings file.

gksu gedit / etc/apache2/sites-available/site1

Change DocumentRoot / var / www to DocumentRoot / home / user / public_html.

Change to.

Save the settings and exit, then disables the default settings and make active site1 settings.

sudo a2dissite default & & sudo a2ensite site1

Finally, restart apache again. In this way, you can make multiple site configuration files, each pointing to a different folder. You can then easily switch between sites with and a2ensite a2dissite command.

Enabling file. htaccess

file. htaccess is a powerful file that can be used to control and customize the behavior of site server without editing the core Apache modules. By default, the function. htaccess is turned off and all the case files. htaccess is totally ignored. The server will not even attempt to read. htaccess file in the filesystem ..

To activate htaccess file, open the settings file that you created previously:

gksu gedit / etc/apache2/sites-available/site1


Save and Exit.

Tuesday, March 22, 2011

How to Save PowerPoint Presentations as Flash Video

PowerPoint is widely used for slideshow presentations, but PowerPoint presentations are not translating into the Web. but we can save the presentation as a Web file, and when you play finally looks messy and unprofessional.

The best way to share a PowerPoint presentation on the Web, without making the audience that you download the PowerPoint file, is to convert the presentation into Flash movie. One of the quickest way to do this is by iSpring, a PowerPoint add-ins.


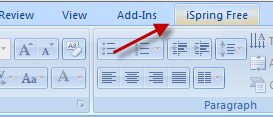
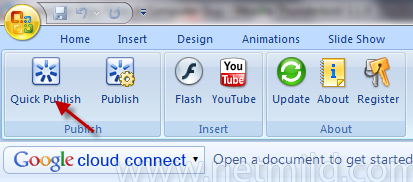
Download and install then you will see a new tab on the far left of the screen. This tab has several options. If you're in a hurry to finish your presentation and save it as a Flash file, click Quick Publish on the far left. iSpring takes a few minutes to arrange your slides, and then generate a folder with the name of your presentation. Upload the contents of the folder to your Web site to share your presentation.


Quick Publish Publish button beside this one does the same thing, but it gives you more choices before saving the presentation. You can change the name of the presentation, choose where to store it (including in Slideboom.com), select the range of slides and preview your presentation in a simulator iSpring.

iSpring retain animations and transitions. Features added is the ability to embed YouTube and Flash video directly into your PowerPoint presentation. Click on YouTube or Flash button to the right of the Publish button to insert any of these videos.

Publish step could take up to 10 minutes to convert from PowerPoint to Flash if the presentation is very long.

How to Video chat on facebook

Another trick that appeals to you if you facebook users, you can do video chat with your friends is the condition of each user who wants to video chat on facebook have to install the extensions "Social Plus" to start a video chat.

Social Plus is an extension for Google Chrome browser, Firefox and Safari that allows you to enhance your Facebook profile by adding skins, backgorund picture, emoticons, status updates, colorful, not like the buttons and more.

Also supports keyboard navigation, slideshow album and when you do not like the status updates, then automatically adds the "I Dislike!" text in the comments box, so you can I Dislike! by pressing the enter key to post comments.

After you have installed the extension of Social Plus, if you restart your browser if your users Firefox users Chrome or Safari you can just refresh your facebook page.

You can download the tool for video chat on facebook here : http://www.social-plus.net/en/