Friday, March 4, 2011

How to uninstall the program in safe mode

Safe mode is one feature of the Windows operating system that is very useful to make repairs errors or problems that occur in the system, which can not be done at boot normally. The problem often faced is a problem usually associated with the virus, or system instability, computer often hangs, the computer can not boot normally. Many are recommended to perform a virus scan in safe mode condition, make changes in regedit or it could be to restore the conditions prior to the problem / damage by using system restore.

To get in on safe mode can be done by pressing the F8 key on your keyboard when the computer is booting. By using the navigation buttons or the up and down arrows select Safe Mode then hit enter.

In the safe mode, not all features and services can be run such as during normal conditions. For example, we can not uninstall a program when in safe mode. This is because computers can not access the windows installer service. If we do the uninstall command in a program in safe mode, it will display a message like the picture below.


“The windows installer service could not be accessed. …… “

to be able to uninstall the program in safe mode condition, it is necessary to do a little setting in the registry editor.

Go to the registry editor by clicking Start, then type "regedit" and press enter.

Once the registry editor window appears, go to HKEY_LOCAL_MACHINE \ SYSTEM \ CurrentControlSet \ Control \ SafeBoot \ Minimal

Right click on the folder at a minimum, then select New and click Key.


Name the key is MSIService

In the right pane double click on default and change the value data into Service


Close the registry editor window.

To enable windows installer service in safe mode, you need freeware or tools that are named SafeMSI. Download it on the link below.

After that double click on the freeware, and now you have windows installer service is active.


now you can uninstall the program in safe mode condition.
Link download SafeMSI: http://bit.ly/SafeMSI

How to disable keyboard button

At some time ago I've posted about how to lock mouse and keyboard with ease by using the tools kidkeylock. To remind me that by using the tools that we can do kidkeylock locking the mouse and keyboard with a variety of locking options. for locking the mouse we can do left click, right click and roll the middle, while on a keyboard that can be done is to lock the key or certain keys or language. If you want to see our full page mode can be opened on disabling the keyboard and mouse.

At this opportunity gretonger will present how to disable the buttons on the keyboard which of course is almost equivalent to the tools above, but there are still differences and functions. To disable the buttons on the keyboard manually we have to understand about the code map of the keyboard functions on the data value in the registry editor such as code scan code map caps lock button on the keyboard layout: 00000000 00000000 02000000 00000000 00003A00. In order not to function or change functions, the code must be changed according to the expected function. Rather than bother to think about the code, already available tools that serve to disable the buttons on the keyboard. In addition to disable the keyboard, these tools can also be to alter the function keys on the keyboard.

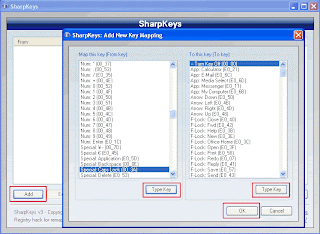
With a tool called sharpkeys, we can turn off or disable the Caps Lock, windows, Alt, Function keys (F1 through F12), the Ctrl key, numeric keys and so forth. In addition, this tool can change the keyboard function keys such as changing the functions of the Caps Lock key me.njadi letters or numbers, change the tab button to the enter key and so forth. For more details, see the following screen shot:


How to use it are as follows:

1. This tool is portable so that direct double click to run it.
2. Once open click the add.
3. In the left panel is a series of codes that the keyboard buttons will be disabled or altered function. or can simply click the type of key and press the button on the keyboard.
4. In the right panel is a series of functions to disable or change the functions of a keyboard button or click the type of key and press the button on the keyboard
5. Once selected click on the write to the registry
6. log off or restart the computer
7. To restore to its original condition, remove or delete an existing command and then click write to registry


Who want to try please download the link below:
http://nzlzp.tk/

Saturday, February 19, 2011

How to use Recovery Console in Windows 7

One of the most useful when you use your computer and place the things you do not want on your Windows, of course, can use the Recovery Console, by the Recovery Console you can perform repairs such as repairing the Master Boot Record and Boot Sector of disk do you have for Windows installed.

Recovery Console in Windows previously existed in Windows XP then the fix in Windows Vista and Windows 7 is extended, at this time. But not all recovery systems worked well but do not worry you can perform the following ways to maximize the System Recovery using the Recovery Console.

Cara recovery windows dengan menggunakan recovery console

For this way you as a user of Windows 7 you can get started on the boot menu by pressing F8 or F12 on the keyboard when entering the Windows logo appears and enter your Windows 7 installation DVD on the menu before installation Widows 7 will have the System Recovery click and select Menu Command prompt .

If you use the Command Prompt you can perform the command by typing "Bootrec" there are four steps you can do using this Bootrec command.

1. BootRec / RebuildBcd -> This will automatically rebuild the Windows 7 boot menu if there have been corrupt
2. BootRec / fixmbr -> this will fix the master boot record (MBR) on hard disk
3. BootRec / fixboot -> this will write a new boot sector to your hard disk. This is useful if you have a corrupt boot sector is damaged.
4. BootRec / ScanOs -> will move the hard disk to the operating system that may not currently appear in the boot menu, for example when a computer is installed 2 OS sometimes on your boot menu OS selection menu does not appear you can do by typing this command at the Command prompt window.

In the next command if you want to delete the boot menu and you can rebuild the boot menu from scratch, you can do with the following command.

Bcdedit / export c: \ BCD_Backup
c:
boot cd
BCD attrib-s-h-r
ren c: \ boot \ BCD bcd.old
BootRec / RebuildBcd

from way above you can solve problems in your windows 7 easily and quickly.

360amigon system speedup Key license

360Amigo System Speedup is a utility tool which is user friendly, fast and easy to use a system optimization utility that comes with a variety of tools designed to improve PC performance. This program has 3 main features - System Cleaner which remove unnecessary data (registry entries, temporary files, broken shortcuts, etc.). System Optimizer stop computer processes the unused or dangerous. And tools to manage the system startup disk, uninstalls programs, provide additional information about the computer system as a whole.


Fitur Utama:

  • Clean junk data and free up disk space
  • Clean Registry Errors
  • Clean hidden privacy exposing traces
  • Permanently delete private data
  • Remove unneeded programs from startup
  • Provides Defragmentation for files and folders
  • Uninstalls unneeded programs
  • Manages/ Deletes System Restore Point
360Amigo System Speedup Pro license key free for $ 19.90 you do enough promo visit the following pages:

http://360amigo.com/en/360amigo-system-speedup-giveaway

And the contents of your details as requested on the registration form.

Tuesday, February 8, 2011

How to convert image to text

What is meant convert image to text here is to convert the image that contain text (can be PDF, JPG, GIF, TIFF or BMP) into a text or writing that can be processed or edited again. Tools commonly used to convert the text in the form of this image is the OCR scanner that cost quite expensive. Unlike an ordinary scannercan only scan an image, or text and then saved in JPG, GIF, TIFFor BMP, this OCR Scanners can directly translate the results of the scan into text. Of course this will help us if you want to retype the article or text that has been finished. This means we no longer need to type one by one word for word, but after being scanned directly into the text and in the edit.

Here we will not discuss these issues OCR scanner, but will discuss ways that, without any OCR scanner we are still able to convert scanned images of text into text. For that we go first to the address http://www.free-ocr.com/. Once inside, search for files to be converted (the maximum size of 2 mb) by pressing the "browse". Then select the appropriate language to writing the image to be converted. Enter the captcha code and press the send file. So the results of the text will be displayed. Next copy and paste it in MS Word or other word processing programs. Done.

Repair missing or corrupt c:\windows\system32\drivers\Ntfs.sys

There are some problems that cause the computer can not or fails to boot on windows xp, like the missing ntldr, hal.dll is corrupt ormissing, and Missing or corrupt c: \ windows \ system32 \ drivers \Ntfs.sys. For the computer fails to boot due to missing or corrupted Ntfs.sys is usually caused by hard disk has been converted fromFAT32 to NTFS, and during the conversion process, this Ntfs.sysfile tercorrupt.

To overcome Missing or corrupt c: \ windows \ system32 \ drivers \Ntfs.sys this can be done by copying files from cd windows xp Ntfs.sys to the system
way is as follows:
1. Set the BIOS / CMOS settings for booting using CDRom
2. Insert your Windows XP CD into the CD-ROM.
3. When came the command "press any key to boot from the CD",press any key on the keyboard (any key)
4. After the Windows XP setup menu press the "R" on your keyboardto select to repair a Windows XP installation using RecoveryConsole.


5. Select windows that are installed by pressing the "1" (If the windows are installed only one) then press enter.
6. When prompted enter the administrator password, enter your administrator password and press enter (If no password just pressenter).
Copy files from CDROM Ntfs.sys into your windows system by giving command like this:

copy x:\i386\ntfs.sys c:\windows\system32\drivers

note: the x in the sentence above is the name of the cdrom drive in computer.each computer can vary. If the cdrom on the computer you are on drive D, then writing a copy D: \ i386 \ Ntfs.sys c: \windows \ system32 \ drivers

7. If the file already exists Ntfs.sys in computer, then there will be a question whether the remains will copy the file, just press the Y keyfor yes then hit enter
8.To exit the recovery console window, type exit and press enter
9. After Ntfs.sys file copied to the file system is complete, take your windows cd and restart the computer. (Set back in for windowsbooting from the hard disk)